
ポスターについて
販売:
このデザインについて
グリッター細部はアートワーク上のシミュレーションです。この商品の製作において実際のグリッターは使用されません。
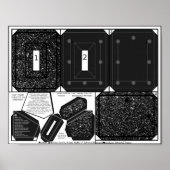
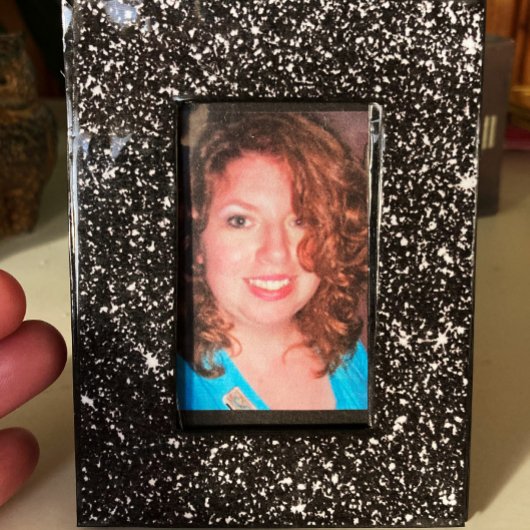
黒Faux Glitter自分撮りフレームパターン2x3写真 ポスター
Black Faux Glitter Selfie Frame Pattern 2x3 Photo Black Faux Glitter Selfie Table Frame Pattern Printable for 2x3 Inches Photo Selfie 3x4" Table Picture Frame Or Ornament Pattern Printable for 2x3" Photo I wanted to create a glittery looking table picture frame, similar to those that are popular in custom frame moulding that I see in Picture Framing Magazine, and in frame shops. So, I played with glitter images in Photopea, and found a way to make the papercraft design "look" as glitter as possible. It's "National Selfie Day", June 21, the start of Summer, as I write! Want to display your selfie? Make a simple "selfie" picture frame, that is made to stand on a table or shelf, or hang as an ornament! The frame is 3x4 inches, and the picture window is 1 1/2" x 2 1/2", for a 2x3" photo, those instant print Instax Fuji cameras, like Polaroid, or those portable photo printer devices, like HP Sprocket, Kodak, Prynt, and more! You can give this as a gift, or as place cards, or party favors, for weddings, showers, parties, and other events! 6 parts plus a panel part for a clear, bendable piece, sandwiched between the easel "strut leg" panels, separate for a top and bottom, the clear piece allows for the strut leg to bend, so that it can pitch out, for the frame to stand! The strut leg panels are optional, and you can use Velcro / hook & loop to connect the whole strut leg to the easel back. Add your design inside the front panel, panel 4 easel back, and panel "5" - the front strut leg panels (optional), OR transfer line pattern panels to back of printed paper, OR print onto waterproof paper or vinyl, or card stock paper then coat with waterproof fixative or laminate. This is for a paper / vinyl substrate / surface material. For paper / vinyl / board tabletop picture frame, for 2x3" photo Endless design possibilities, of your choosing! Add embellishments, ribbon, buttons, you name it! Connecting panels 2 & 3, labeled above them, with ribbon thread through the 7 u shaped, 3 sided circles, hole punched, thread in both directions, creates the photo pocket for the photo and it's clear photo sleeve, cut from a sheet protector page - just make sure the package is labeled "acid free" and/or "photo safe"! 4 main panel patterns, labeled: panel 1 - front - top left panel 2 - connected to panel 3 with ribbon panel 3 - thread ribbon through circle holes panel 4 - easel back - back of frame - top part of strut leg attached with glue or hook & loop to easel back - bottom right Plus these panel patterns, on bottom left of sheet: front strut leg panel, split top and bottom - split in the middle along middle of 3 lines as shown strut leg bottom strut leg top to right on angle - box top back strut leg for glue or hook & loop pattern sky blue, 5 sided, line pattern for clear, photo safe / acid free, cut from sheet protector page, bendable strut leg piece, sandwiched between front & back - can use felt, fleece, vinyl, any substrate that is thin and bendable Instructions: Coating the sheet printable is optional, with a spray or paint on fixative from the craft store, laminate with a thinner, 3mil self laminating sheet Cut out all the panels, including their flaps / seam allowances the fold under Cut away and into corners, along lines shown, fold the flaps under, tape / glue / adhere down Hole punch all circles Thread 1/8" or 3 mm wide ribbon 2 feet long, through panels 2 & 3, print sides facing in, thread in and out the holes both ways, knot on both side Adhere panel 1, the front, print side up, on top of panel 2 facing down, glue inner edges one side at a time, then outer edges Adhere panel 4 print side up, on panel 3 print side in, leave bottom corner sides free of glue Adhere any sides left open / not connected, make sure to leave the top open between panels 2 & 3 for the photo and clear sleeve, cut to the size of the photo, from the acid free clear sheet protector Attach top of strut leg to easel back, align the bottom right corners first, hold, gently place on work surface, flip top of strut leg back, add strong glue, the press onto easel back. Instructions for strut leg: Cut out front and back strut leg panels, include flaps or seam allowances to fold under, separate front top from bottom, fold under flaps at bottom of top strut leg and top angle of bottom strut leg Cut out clear strut leg piece, place inside the bottom 3 flaps, glue near top flap, then glue down bottom 3 flaps over clear piece Manipulate inside the flaps of top strut leg flaps, glue at bottom edge, the the other sides, glue down over the clear piece. Place top strut leg, all sides folded in and adhered down, of clear piece, do the same for the bottom front strut leg panel, but leave space unglued at both sides of the bottom right corner. Ribbon will extend from inside the layers of the bottom strut leg, and connect to bottom right corner, tucked inside the bottom right corner of the frame. With ribbon tail extending from bottom right of strut leg, adhered inside, place finished strut leg bottom right corner, sides aligned, glue down on top With top strut leg connected to easel back, stand the frame, pitch the strut leg, push ribbon tail under the bottom of the frame, sticking out in front of the frame, trim down to 1-1/2" in front of frame, mark with pin where it stands on its own, push remaining tail inside bottom right corner of main frame in space. Glue in place, on inside. Ribbon connects panels 2 & 3, just hole punch the circles with a long reaching, quality hole puncher, do after the flaps are folded under and adhered down. Ribbon 6" long by 3/8" to 1" wide connects the easel back and strut leg at the bottom right corner, for it to stand - it stops the strut leg from pitching out too much. Can cut clear vinyl to the dimensions of the ribbon measurements and use. Cut photo sleeve from same clear, acid free, photo safe, labeled on package, sheet protector page, sold in Walmart, Walgreens, Target, & online in sheet packs of 10, 25, 50, and more. Letter size. Can cut bendable strut leg piece from same sheet protector page. Copyright protected Selfie table easel picture frame for 2x3" photo by Kristie Hubler / fabricatedframes.com , 2015. All Rights Reserved. For personal use only. For licensing or selling finished product retail, please contact Kristie at fabricatedframescom at gmail dot com Thank you! Kristie Hubler artist, inventor of washable fabric photo frame, fabric / surface / product / pattern designer, card, calendar, paper hat, invitations, and other printables, author, owner of http://fabricatedframes.com https://zazzle.com/store/fabricatedframes/products
自動翻訳

カスタマーレビュー
5つ星評価のうち星5.0全レビュー数 1
レビュー:1
類似商品のレビュー
5つ星評価のうち星5.0
5つ星評価のうち星5 M.2019年10月1日 • 認証済みのご注文
ポスター、サイズ: 50.80cm x 60.96cm, ハードウェア: なし, フレーム: なし, メディア: 標準セミグロス, マット: なし,
Zazzleレビュープログラム
初めての購入です。
色々なサイトで結婚式アイテムを探していましたが、可愛いらしすぎるデザインが多くて悩んでいましたが、
Zazzleで好きなデザインがいっぱいあったので、いくつかのアイテムに利用しました。甘すぎないデザインも多く、
フォントの種類も豊富で作成するのが楽しかったです。 日本語フォントもあり、アメリカで印刷されるのに文字化けしないのだろうかと心配していましたが届いてみたら思っていた通りにできていて感激でした!
価格も送料を入れても日本で依頼する半額程度でできたので満足です
タグ
その他の情報
商品 ID: 256430147972713795
出品日: 2024/6/24 4:08
レーティング: G